Pages

Showing posts with label Brayer. Show all posts

Sunday, June 13, 2010

Brayer in Silhouette

More playing with my brayer!  This time, we're looking at a wonderul silhouette image.  I saw a card similar to this somewhere but honestly, I don't remember where so sorry I can't give credit!  I do remember, however, that the person who did it gave inspirational props to Michelle Zindorf so that's where I'm giving mine!

I tried some different things with this card.  For one, I started brayering on Very Vanilly instead of my typical Whisper White.  I really like the effect  it certainly brought more shading possibility to the layout.  I also brayered the card background for the first time.  I don't know what it is but sometimes I just can't wrap my arms around brayering color on color.  I like it, though!  Don't be afraid to try new things.  The results might not be as scary as you think!

Card Stock - Daffodil Delight, Cajun Craze, Basic Black, Very Vanilla
Classic Ink - Basic Black, Certainly Celery, Garden Green, Daffodil Delight, Cajun Craze
Accessories - 2 Step Bird Punch, Top Note Bigz Die, Vanilla Smooch Shimmer Spritz
Stamps - Inspired by Nature

Thursday, June 10, 2010

Awash with a Brayer


When I need inspiration for a card, I head over to visit Michelle Zindorf's blog.  She is CRAZY talented!  Her brayer projects and tutorials are just incredible.  I love to visit blogs that spark my creativity and Michelle's does just that!

This is a version of one of Michelle's cards.  I "dumbed it down" a little bit from Michelle's version.  I changed around the colors and used a very basic matting.  Of course, it you odn't know what the original looks like, I bet this one is still pretty impressive :) 

This card is a great sneak peek into the 2010-2011 Idea Book & Catalog!  It's made with the Awash With Flowers set that will be available on July 1.  I was also able to incorporate some new colors into the card as well - Marina Mist, Cherry Cobbler, and Cajun Craze.  Grab your brayer and start rolling!!

Card Stock - Almost Artichoke, Elegant Eggplant, Cherry Cobbler, Basic Black, Whisper White
Classic Ink - Certainly Celery, Almost Artichoke, Bashful Blue, Marina Mist, Elegant Eggplant, Cherry Cobbler, Cajun Craze
Accessories - Photo Corner Punch, Circle Bigz Die, Vanilla Shimmer Smooch Spritz
Stamps - Awash With Flowers

Tuesday, June 8, 2010

A little brayer inspiration

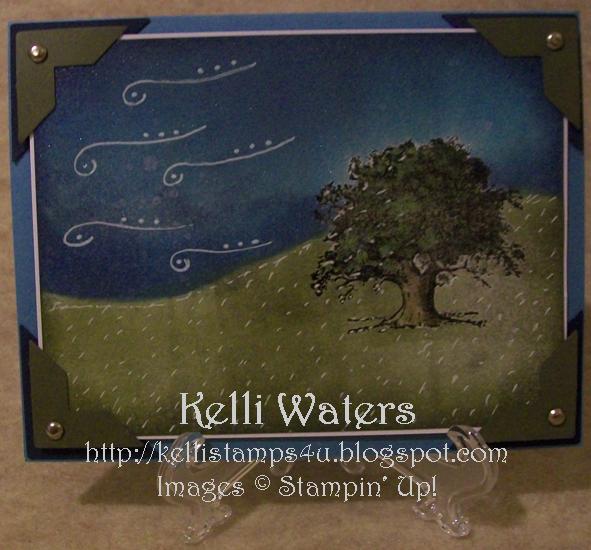
I absolutely LOVE my brayer!  I've done quite a bit with it and continue to work with lots of new tricks and techniques. On Thursday night, I'm teaching my next installment of brayer classes - Brayer Beyond the Basics.  We're going to explore mixing and blending of colors along with the addition of some sponging and added mediums.

This is one of the cards we'll be making in class.  I took several pictures of it and this is the best of the bunch.  I wish I could have gotten a little better resolution.  The Smooch Spritz was reflecting off of the flash but hopefully you will catch the drift :)  You can click on the photo for a larger image.

Card Stock - Marina Mist, Night of Navy, Almost Artichoke, Whisper White
Ink - Classic Ink in Basic Black, Sahara Sand, Marina Mist, Night of Navy, Certainly Celery and Almost Artichoke, Versamark
Markers - Stampin' Write Markers in Almost Artichoke, Wild Wasabi, Crumb Cake and Soft Suede, Versamarker
Accessories - Photo Corner Punch, Silver Brads, White Gel Pen, Clear Embossing Powder, Vanilla Shimmer Smooch Spritz
Stamps - Lovely As A Tree

Friday, May 14, 2010

Love your BRAYER!!

Last night was the first in my series of brayer classes.  We were working on Brayer Basics.  I absolutely love my brayer!!  By learning a few simple techniques, you can make some amazing background and fun elements for your cards and scrapbook pages.

We started Brayer Basics by working on simple color blending.  After that, we used two colors to create a wonderful floral horizon.  Our last card used the beautiful Bride Designer Paper and our own rainbow ink pad made from baby wipes and Classic Reinkers to make fun butterfly embellishments.  Lots of learning and fun was had by all!!

Ready to learn the next step in your brayering adventure?  Join me for Brayer Beyone The Basics!  You will continue to add color, depth and design to your beautifully inked creations. Brayer Beyond the Basics will teach you to blend color, mask areas to create depth and dimension, and use new techniques to bring your brayered cards to a whole new level!


The cost for this class is $20 and includes a pack of Stamping Sponges and a bottle of Vanilla Shimmer Smooch Spritz. You must bring your brayer to this class. If you would like to order a new brayer, you can add one at the time of registration for just $12.50.

RSVP and payment must be received by June 1. Space is limited!

This class is available as a Class To Go. With a minimum of 4 participants, this class can be conducted in your home or mine on a date of your choosing. Please plan at least two weeks in advance to allow time for payment and product ordering.


Class Options


Tuesday, April 20, 2010

Technique Thursday - Brayer Basics

What do you do with your brayer? Have you seen some of these beautiful multi colored backgrounds and wished you knew how to create them yourself?


Brayer Basics is a special Technique Thursday class that will teach you the basics of how to use a brayer, created graded color backgrounds and make some cool techniques.

This class comes with a brand new brayer for you to use during class and take home when you’re done. Already have a brayer? You’ll find out during this highly anticipated class that having more than one is a very good thing!!

RSVP and payment for this class are due no later than May 4. You can register by sending me an email or by making your payment via Paypal below.

Technique Thursday – Thursday, May 13
Start time: 7:00pm
Class Cost: $20
RSVP: May 4

This class is now on wait list status.  If you are interested in attending this class, please email me and we will establish a second date for this class.

Monday, March 22, 2010

Brayered Background

I just love my brayer...or brayers, I should say.  With a little know how and some time, you can make some beautiful and fun backgrounds for your cards and scrapbook pages!  This is one of my latest brayered background creations.  I wish you could see the sparkle.  It's covered with shimmer paint mist and this card absolutely pops!

Colors used to create this background were So Saffron, Pumpkin Pie, Really Rust, Sage Shadow, Mellow Moss, Almost Artichoke and Basic Gray.  The stamp set used is Upsy Daisy, one of my favorite standbys.

It's pretty incredible to think that this card started out as a white card front.  I had a lot of fun making this design.  So much so that I whipped up 20 of them for some special customers :-) Because of the great response I've gotten from several of the brayered backgrounds I've been working on lately, I'm looking for a date to schedule a brayer class in the very near future.  Be sure to check my Facebook Fan Page or my Meetup for information on the upcoming class date.

Tuesday, March 2, 2010

Sometimes it's hard to make a card

Nothing lives forever.  Not even the special four legged friends we bring into our homes that give us such joy for so many years.  One of my coworkers lost her buddy and I wanted to send a special card to let her know he's on my mind.  D Is For Dog is one of those sets I wanted because the images are fun for dog lovers but there's a stamp I didn't want to use - "So sorry for the loss of your best friend".  It makes me sad :(

I was inspired by a card I saw on SplitCoastStampers made by "Warm Glass Goddess".  I pulled out my brayer (we've become close lately).  I created the soft night sky with Bordering Blue, Basic Gray, and Night of Navy.  The water was brayered with Tempting Turquoise and Take With Teal.  The grass is a combination of Garden Green and Handsome Hunter.  Can you see Spot's reflection in the water?  Champaign Mist Shimmer Paint was applied to the edge to give a hint of subtle shine.  The cardstock is Basic Gray for the base and Night of Navy for the mat.  My son says it looks like doggy heaven.  Ugh...

I'm a dog lover.  I have fur babies of my own that keep me sane and drive me crazy (see this post if you missed one of the reasons why!)  I don't even want to think about what our house would be like if there was nobody around to steal my fries when I turn my eyes away too long :)  One of the things I love the most about being a card maker is that I can send a kind word, warm smile, and heart felt hug in an envelope when I'm not there to give them in person.

Thursday, January 21, 2010

Everything Always


Everything - defined in one of my favorite stamps sets as Define Your Life as "All things that are meaningful to you. All that you know; the whole world".  With Valentine's Day approaching, I start thinking about my Everything. 

Inspired by the love of my children, this Valentine's Day card was so much fun to make.  Using a mix of my favorite pinks and reds - Pretty In Pink, Pixie Pink, Ruby Red, and Bravo Burgundy, the background of the card was brayered and sponged to get that cool graded effect. The White Organza ribbon was "dyed" to match the graded color by adding a touch of all colors.

The stamp sets used for this card are Always and Baroque Motifs.  Both have become great go to stamp sets for me whenever I'm feeling a need for some loving inspiration.  What inspires you?

Wednesday, January 13, 2010

Vintage Versamark


Ok...I'd admit this up front.  This card is a total CASE from Leadership.  It was shown in the Workshop Elements class I took and I totally fell in love with it.  It uses both the Watermark and Versamark Resist techniques (see my brief tutorial here).  The one thing I changed between my card and the one I saw is the bottom border.  Instead of using the vine stamp from Vintage Vogue, I used the Very Vintage roller in Versamark.  Same concept, tho.

I would love to give credit to the originator of this card but I can't find my materials!  If you know who created this card originally, please email me so I can update this post to give credit where credit is due.  I think this is just too totally cool to go unnoticed!

Happy Stamping!!

Tuesday, January 5, 2010

Vintage Versamark Resist


Another swap I'm taking with me to the Stampin' Up! Leadership conference is this fun Vintage Vogue card featuring a new stamp set of the same name from the Occasions Mini Catalog.  I'll be honest, this set really didn't do it for me when I first saw it.  I've never been all that into the old world vintage looking style.  I really couldn't quite picture exactly what I'd do with it.  Once I started playing, however, I fell in love!

The background of this card was made using a technique called Versamark Resist.  This is a fun and easy way to create your own custom backgrounds to match any of your projects.  I love this technique for scrapbooking, too!

To create a project using the Versamark Resist technique, you need Versamark Ink, a paper with a glossy finish, a brayer, and ink.  For my paper, I simply used Stampin' Up!'s Whisper White. It works really well with this technique.  Our glossy paper is great for this also but does require additional dry time.


Stamp your image all over your paper using the Versamark Ink.  I tried to get a good photo of the Versamark on the paper and if you click on the photo, you should be able to see it.


Ink up your brayer using Stampin' Up! Classic Ink in whatever color you want your background to be.  Roll over your piece several times in multiple directions to get an even coat of ink on your cardstock.  Depending on the paper you've used, you may need to let it dry for a while before you try to move it to avoid finger prints.  When I use the Stampin' Up! glossy paper for this technique, I like to let it sit for a good 2-3 minutes before I try doing anything else with it.  Dry time will also depend on how much ink you put on the image.

Once your piece is dry, use your beautifully stamped background image to create your card, scrapbook, or other work of paper art.  This can be a very addicting  technique!  Go ahead...try it! :)